Topics Detail
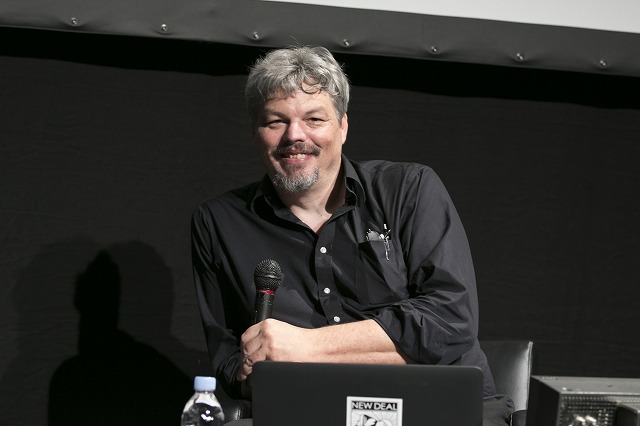
Ian Hunter, one of this year’s Oscar winners, unveils the secrets behind the visual effects in “Interstellar”!
Ian Hunter, whose credits include Christopher Nolan’s “The Dark Knight” and “Inception,” won this year’s Academy Award for Best Special Effects with the film “Interstellar.” He demonstrates the magic of special effects, ranging from traditional miniature/stop motion techniques to the latest digital visual effects. Don’t miss this opportunity to catch his seminar again here! Here is Part 1:
A very special guest for our Hollywood VFX seminar, please welcome,
Ian, they’re all yours man, go for it, have a good time.
Thank you for the introduction John, and thank you to everyone here for attending this seminar about visual effects.
I’d also like to thank the staff and directors of the Short Shorts Film Festival for inviting me, it’s a real honor for everyone to want to listen to me and hear about what I have to say about visual effects and see some of the work I’ve done in the past.
Again, I’m Ian Hunter. I’m one of the creative directors and founders of New Deal Studios in Los Angeles California, and we are a company that’s been doing visual effects since 1995.
We started out doing miniatures and art direction, we then moved on into doing production photography for visual effects, digital effects, and recently, we’ve, my business partners actually, had the privilege of directing 2 features and we’ve produced those features and we are now moving into virtual reality, live productions.
So over that course of time, we’ve actually done quite a bit of work, but one of the things that we’re really known for, we specialize in is miniature effects.
And in this day and age where so many visual effects are created, completely synthetically with CG, it’s interesting to see how miniature effects fit into the digital age.
Using miniature effects differs from strictly doing digital CG in that you need to pre-plan what you’re doing before you commit to doing the job.
And I’m going to show you a couple of demonstrations of that.
One was for the movie “X-Men: The Last Stand” and this was directed by Brett Ratner.
And in the film, Brett wanted to do a scene where Jean grey, the character Jean Grey is able to lift her childhood home, she goes kind of crazy, and then it crashes down and smashes itself.
And in order to do that, the supervisor on the film, a man named John Bruno asked us to come in and build the house as a physical effect and combine that with CG in order to carry off the shots that the director had asked for.
So the first thing we did was, we made, we did some previz and that meant that we animated the scene first in the computer, first in the computer, and we used this as a planning guide to layout what was going to be done physically, and what was going to be done in CG.
It also told us where to put the camera for each of the shots and told us how long the shot needed to be.
Once we had the previz, we use that for planning purposes and built a miniature house which matched the house that was in Vancouver, Canada, where they shot the live action.
Now everyone is wearing face shields because the house is full of explosives, because it’s going to crash and explode.
And we took the miniature house outside and photographed it against a blue screen, in daylight, matching the sun angle from the photography in Canada.
And we prepped it with a lot of balsa wood and slide glass to make the windows break and we built the lawn in front. Anything that would interact with the house as it collapsed was built as a model.
And here we are photographing it.
And we shot it from several angles. And then we took the photography, scanned it, removed the blue screen, then added background imagery taken from Canada.
We then added in shadows that were cast on houses that weren’t there based on using a digital model of the house.
We combined the photography with elements shot separately of debris, dirt, leaves, water.
We also created CG versions of water and shingles et cetera.
And these were all combined together in the composite, and we used the previz done earlier as a guide for the animation.
We also needed to add in Storm and Wolverine, and Juggernaut as they fall out of the house, and those were actually digital characters that we created and animated as they came out.
And this demonstrates the other angle it was used. Again, physical model, digital map painting for the background, digital and physical water, digital and physical shingles and debris, all combined together in the composite.
And then we also added some real plants that we would shake in the shot, to liven it up a little bit more.
So what the, what happen changes about using miniatures in this particular case is that the house collapses and breaks.
And if we build a physical model and we photograph it, we score it so that it can come apart it actually looks real because it actually is real.
It just happens to be smaller than a full size house, but it’s still made of physical material, it still breaks and collapses like a physical object would and it’s a good example of combining physical models with digital animation.
This was for a very short shot, or a set of shots which showed some destruction.
Our next example is from the film “Night at the Museum 2: Battle of the Smithsonian,” and in this movie, the director Shawn Levy asked us to do a scene where he showed a character of Amelia Earhart escaping some bad guys by flying through the National Air and Space Museum in Washington D.C.
Now they built the full size set of the museum in Canada again, and they shot that scene for all the live action, and then they shot Amelia Earhart’s character flying on the Wright flyer which is the plane that the Wright brothers had used to first fly.
And they shot that against green screen, they had no backgrounds yet, but Shawn had an idea what he wanted the scene to be, and he described that scene to us, and he shot his live action to fit that scene, and we took all that information from him, and we again, created a previz that would show this scene in action, this fly through the museum.
And what happened with that is we took that previz and we used a little bit more specifically to inform us on how to build the model and animate the camera and ultimately composite the scene together.
So that is a case where we take previz and becomes what we call techviz where we’re actually using that to measure the size of the model, measure the camera motion, and create all the animation based on that.
Here we are showing the green screen elements of what we were given, we then previzzed the background, and then we took that previz, and we used that to build miniatures, so then we used that previz to plan out miniature size, lay that out carefully in 3D, lay it out to our stage, and then once we did that we translated that into the actual construction of the models.
So each of the airplanes was built and placed in the CG version first and then built physically so we could add that back into the miniature.
We also built the museum itself on our stage and it was built in modular fashion so that it could be put together in pieces.
And then again we took the previz and used that to guide our camera through there so we can actually figure out how big our physical models needed to be, how big the physical camera needed to be, and make sure that we had access to shoot the miniature exactly like the previz.
And then we finished painting it. We made the roofs removable so that as the camera moved through we could actually pull the roofs out and get the camera to pass through the set.
Here we are finishing it, and again that previz or techviz was actually used to inform us where everything needed to be exactly to match the animation that we’d already done so that when we photographed it it was a one to one match and gave the director exactly what he wanted.
Here we see our camera which is a motion control camera with a snorkel lens, and its going through the model, and then we take our previz, we’ve built our models, we put them on our stage, we’ve put our camera in, and then when we walk through, we get a very good match to exactly what we did in the previz, in terms of what we photographed.
Rhythm and Hues was the name of the company that ultimately took our backgrounds and our animations for the Wright flyer and then combine that with the digital version of the Wright flyer that they created so we have both live action and a digital plane and then combine that with the digital version of the Wright flyer that they created so we have both live action and a digital plane and a miniature background and here’s the scene as it appeared in the film. So that was a good example of using miniatures to create a background that you couldn’t do in live action.
We thought about trying to shoot in the real Air and Space Museum.
Their Air and Space Museum is not actually as long as it is in the movie.
It’s hard to get in there, and they wouldn’t permit us to actually shoot those backgrounds and we couldn’t get a camera to actually do the motions that Shawn wanted to see in the film.
So in that case, it made sense to build a miniature, and shoot that as the background.
So we’ve got destruction with miniatures combined with digital effects, we’ve got backgrounds that were creating and combining with digital effects, and the next series of slides I’m going to show you, we’re doing some commercials for Arrowhead Water.
In this particular case, Andy Hall who was the director of the commercials, from Elastic TV, he wanted to create a series of commercials that looked like stop motion animation; conventional stop motion animation.
But because of the short schedules that we often have to build and create commercials, we didn’t have enough time to actually shoot it as stop motion.
However, he came up with a really bright idea which is “well let’s combine miniature backgrounds so we get the texture and the detail and the lighting that we would get from shooting something for real.
And combine those miniature backgrounds with CG anime characters.”
And because we had a miniature background that was lit and had a specific look, the CG characters could actually be lit and influenced by the physical model so that they fit into the space and look like they were there for real look like they were done as stop motion animation when in fact they were done as CG
And the reason that was something that we could do in a short period of time, it meant that we could build the miniatures, and as the miniatures were being built, we could actually do the animation at the same time.
So Elastic TV animated the characters, New Deal Studios built the miniature backgrounds.
There were mostly forests, and the nice thing about doing a miniature was that we could do a lot of texture, we could add a lot of plants, rocks, little mushrooms, tree bark et cetera.
And make this a very detailed, a very rich textural world.
We also did a series of these commercials and built different forests for each one.
And this one was called “the Lab” which had a hollowed out tree full of little jars so we could add all that little detail in there.

This was our sort of generic forest set that was used in several of the spots.
And the other thing that we did was to not only build a miniature foreground but as you recede in the distance, the models get smaller and smaller, it’s what we call force respective.
So that it appears you have greater depth than in fact you really have.
And in fact the skies are also backings.
And a really good example of force respective was this road that we built for one of the spots called “the Shipment” and in that one the road is actually wider at the front and as you go back, it gets narrower and narrower and then it finally goes down a hill and comes back up again and in fact that hill is much smaller.
So you can see where the trees get smaller and smaller and the road gets smaller and smaller, and that gives the illusion of greater depth. But in fact, it’s a very small compressed set. And it means you don’t have to build as much.
You can only shoot it from this angle, however.
And we also did another spot called “the Supermarket” where we built a supermarket.
And again that shows you the scale of the sets.
So the scale of sets was very similar to what you would do if you were going to do this as a stop motion piece.
We built these in 1:18th scale.
We had a backing, we had lit signs, we had all the products inside the store, canned goods and et cetera, cars parked in the parking lot.
But you’ll notice in this slide, and in this one, we also made a 3D model of the bear itself.
So we would put this into the scene with it lit, and photograph it so that the animators had reference to where the sun was, where the shadows were, and this really helped them a lot when they were doing the animation, because it allowed them to integrate the animation into the miniature backgrounds in a seamless manner.
This is another good example of a force perspective set.
The tree in the front with the bear is one scale 18th scale, but as you go further and further back, the benches are in 24th scale, and the trees in the far distance, the autumn trees are actually in 1:32nd scale.
So this is about combining different scales to create a great deal of depth.
All of these sets were put in our stage and photographed with motion control cameras.
So that’s our motion control system. And it has a camera on the end of it.
And we set up the stage so that we can have one model facing one direction and another model facing another direction and program the moves based on the previz again, that was provided to us by the Elastic TV.
That meant that we could shoot exactly what they previzzed or animated beforehand, it meant that the animation they were working on would fit into the scenes that we were giving them as elements.
And the result was that we were able to create this again, hybrid look that felt like a stop motion animated piece but was actually combination of CG and practical effects.
And this demonstrates the animation and combination of that work.
So here we are doing studies for the bear, building the model of the bear, creating walking cycles, all as animation is being worked on, and while that’s being worked on, we would be building a miniature itself.
Here they are working out the fur texture.
And so the animation is being worked on in one place and we’re building miniatures in another.
And then those combined together to create the final effect.
Also there was a squirrel character that figures in a lot of spots.
Again, start with animation, start with the model, put in the lighting reference, and then add the animated characters, here’s our bear, sorry, the deer, the force respective road, again, lighting reference of the truck, lighting reference of the bear, animation. Oh, the rabbits. I love the rabbits.
Same thing, build the characters, build the sets, shoot them together, with lighting reference, and then combine the animation later in the compositing.
And some of the jars in the background are real, and some of the jars in the foreground are digital jars.
To be continued…Part 2
 Ibaraki Short Film Award winner is Takuya Matsumoto!
 [Recommended Event!]Short Film by Takeru of SuG Screening Event
Recommend
 LEXUS Special Event Details


 Collection of world's best short films are compiled in "ANNIVERSARY" DVD, now on sale at LOUNGE by Francfranc (Minami Aoyama store) and other locations.